Wednesday, August 30, 2017
Wedding Pallet Sign
For our wedding last year, I wanted to create something to let people know the day of agenda, but I didn't want to make programs that people would end up throwing away.
I also wanted to create a sign to put near the entrance so people would know they were in the right place for our wedding.
So, I decided to create a large pallet sign to solve both of these needs.
Using the same idea as the small pallet sign I made for our engagement photos, I had my dad build a large sign using 4" cedar boards. The final sign ended up being 7 boards tall.
We used grey stain to paint the sign to keep it consistent with our wedding colors.
Based on the size I created my design. I knew I wanted to include times for the ceremony, dinner, dancing, cake and fireworks.
I put our initials at the top followed by lyrics from our 1st dance song. And to fill the remaining space I used a cute lovebird graphic.
I cut all of the words out of outdoor safe vinyl in white and pink and carefully applied them with transfer tape to the sign.
If you are looking for some pretty script fonts, I really love the bundles from HungreyJpeg. Their current Smashing September Bundle has over 45 fonts for only $29!
In the end I was very happy with how the sign turned out. And now we have a fun wedding memento as well.
Tuesday, August 15, 2017
How I Use My Erin Condren Life Planner
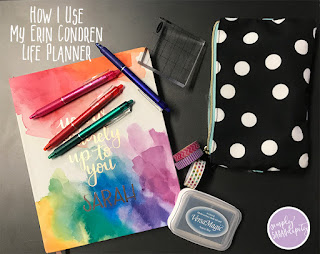
Since starting my own blog and Etsy shop I noticed I was feeling frazzled and overwhelmed with tasks and remembering things. I read a blog from a fellow crafter, Jennifer McGuire, about the Erin Condren Life Planner and I decided to order the Hardbound Vertical Life Planner.
I really liked how the vertical planner had 3 sections per day. That way I could keep my personal and business tasks in the same place but still separate.
And for only $35, the hardbound planner is 18 for months! I thought this was a good deal for an Erin Condren beginner. She also offers a spiral bound planner which I now have my eye on!
I am still getting the feel for the layout, and deciding what items to track, but overall I definitely feel more organized. I can open my planner before bed and make sure I've paid the necessary bills, filled my Etsy orders, or just keep track of blog or social media ideas. (And yes I like to include what TV shows I want to watch!)
I'm a simple planner and use basically pens and stamps. I am really liking the Pilot FriXion Pens. They erase clean, write very smooth and come in plenty of colors.
I use MFT Planner Basics stamps for my headers and I use some of the icons as needed. I've experimented with several inks and had many bleed through. Right now I am liking a chalk pigment ink by Archival. I've tried several pigments inks (and dye inks) like the versa fine and found they bleed through.
I keep all my stamps and pens in a Happy Planner planner bag I found at Hobby Lobby.
For me it helps to make planning fun with these accessories. I know there are 100,000s of stickers and planner kits out there as well, but for now I plan on keeping things simple.
Thanks for taking the time to read how I used my Erin Condren Planner!
If you are interested in the Erin Condren Planners, please use my referral link to save $10 off your first purchase!
Subscribe to:
Posts (Atom)


