Monday, December 2, 2013

Deco Mesh Garland

I'm so excited to share my finished Deco Mesh porch decorations! We wanted to use our porch as a back drop for some holiday pictures and I think it turned out nice.


To make the garland I used a 9' work garland in dark green. I stretched it out and opened all the ties to make it easier to work with.


I started with the 21" red, green and white striped mesh. I used about 9 inches of mesh for each 'poof'. A quick way to measure is to pull the mesh to the next tie, then poof up the mesh back to the original tie and secure the poof.


After the 21" mesh, I used 10" green mesh. I made a few bows randomly throughout the garland with the green.


I used a 2.5" red ribbon as accent for the garland. Every 2 ties I made a bow. When making the bows I would start with the 2 large loops then make the center so I could twist the ties inside and they would be hidden by the bow.


I finished the garland with some green, red and white ornaments. I used the ties and some floral wire to attach them randomly throughout the garland.


After we hung the garland on the porch we wrapped white lights around it. 


Makes a nice holiday card background I think!

Tuesday, November 26, 2013

Deco Mesh Obsessed

A few months ago I decided to make a wreath using Deco Mesh. I've seen the mesh everywhere so I decided to see what all the fuss was about!

The great thing about Deco Mesh is that it holds its shape and can withstand the outdoor elements  - rain and sun. (No fading!)

So I started making a Fall wreath. I used a 21'' Poly Mesh roll of brown and orange stripe and a 10'' roll of gold.  For my first wreath I used a Styrofoam wreath and floral pins to attach the mesh.  I used some olive green ribbon for bows and a few fall picks to decorate the wreath.


I also added a string of battery powered lights. I think my first Deco Mesh wreath turned out nice. Using the styrofiam wreath I had to use more mesh to cover it and make it look full. I decided to keep researching to find a better/easier way to make things with Deco Mesh. 

I found the Mardi Gras Outlet's online videos which inspired me to make a Christmas wreath and garland.

Here is the wreath How-to Video - 


And the garland How-to Video -


The secret to making Deco Mesh wreaths is the work wreaths and work garlands! And my Hobby Lobby has all Deco Mesh supplies on sale 50% off!

For my Christmas Wreath I used a 21" Poly Mesh roll in Red, green and white stripe, a 10" roll in green and a 2.5" red ribbon.


I used small red, green, and white ornaments as accents and a strand of white battery operated lights. I think it turned out great! I can't wait to decorate my porch for the holidays!

Friday, November 15, 2013

Best Chocolate Cake

I am not a huge fan of chocolate cake. (I prefer chocolate icing on yellow cake.) But I decided to make a chocolate cake while family was in town last week.

One of my go to blogs for recipes is The Pioneer Woman - Ree Drummond. I did a quick search and found The Best Chocolate Sheet Cake. Ever. A chocolate cake that bakes in 20 minutes and I had nearly all the ingredients on hand! And with a title like that, I had to see if it really was The Best.

The cake batter has butter and lots of cocoa powder so I had a good feeling it would be tasty.  But I was hoping it would also be moist and not bitter chocolaty.

I didn't sift the flour but you might want to if you are OCD about smooth batter like I am.

The one ingredient I didn't have on hand was buttermilk, and I think it is what takes the chocolate cake to another level of yumminess!

The recipe says to use an ungreased sheet pan, but I sprayed mine before pouring the batter in.


You can see some of the lumps in the batter from not sifting the flour.

The best part about this recipe is the cake only bakes for 20 minutes!

The BEST BEST thing about this cake is the icing. It was amazing, I am surprised I didn't eat it all before the cake was done baking.


I omitted the nuts because not everyone in my family is a fan of nuts. The icing is more of a chocolate ganache/glaze. It pours over the cake beautifully. I think I will use it on other cakes I bake because it was so simple and so delicious! Again, if you are OCD about smoothness, you may want to sift the powdered sugar or use a mixer to get all the lumps out.


The icing will harden in just a few minutes. I kept my cake in the sheet tray and cut and served it right out the tray.


I can agree hands down that this is The BEST chocolate cake. Ever. It is smooth and moist, and milk chocolaty! You can even eat two slices and not feel guilty because its so thin because of the sheet tray. I will definitively make this chocolate cake again.

Wednesday, November 13, 2013

Everybody Makes Mistakes

We found a recipe for a Homemade Chocolate Pie in American Cowboy magazine and decided to make it. I have never eaten or made a chocolate pie before, but how hard could it be?


The recipe called for a homemade pie shell, but I decided to just use a frozen one.

*IMPORTANT TIP* When making a custard or pudding pie you must bake the pie shell first, before adding the custard or pudding. Otherwise the shell will never fully cook. 

Sadly, I learned this lesson the hard way.

I started by making the chocolate filling. Be very careful as you mix the sugar, coca, flour in the sauce pan because it will burn easily!  Make sure you are watching and stirring constantly. I would also recommend sifting the flour. I added in the cream and milk and brought the mixture to a boil.

The next step was to add the eggs to the boiling mixture. Now this recipe did not say to temper the eggs, but I did anyway and I still ended up with some scrambled eggs! After I mixed in the remaining ingredients I poured the entire mixture through a sieve to strain out the lumps.

Here is where I made the BIG mistake of pouring the chocolate filling in to a RAW pie shell. The recipe did not mention par baking the shell and I didn't know that you always par bake a shell before making a custard pie.


Needless to say, this pie was not edible because the shell was raw. :(

I made this pie again a few weeks later and decided to use a graham cracker pie shell. I thought chocolate, graham crackers and toasted marshmallow (the meringue topping) would be like a S'mores Pie!

A few comments about making the meringue. I noticed that after baking and refrigerating the pie was "sweating" out the cornstarch, sugar and cold water mixture. I don't know if it is necessary to add it, I think the meringue would be fine without it. I just put the egg whites, cream of tartar and sugar in my stand mixture and the meringue was nice and fluffy. Just be careful not to over beat.


After making the pie with the graham cracker crust we finally got to try it out! The pie is SUPER sweet but very delicious!  The meringue adds a lot of sweetness so I think it could be omitted. The chocolate pudding filling was amazing by itself!


This pie wasn't easy to make, but I learned a lot of valuable lessons that will help with other baking endeavors in the future.

Monday, September 16, 2013

Divergent

Divergent by Veronica Roth

I have been on the waiting list (from my library) for this book for months! Last week I finally got the exciting email saying it was available for me!

To be honest, I hadn't heard about this book until talk of the movie with Shailene Woodley. But once I read the description, I was hooked. It definitively reminded me of Hunger Games, which I loved, so I knew it was a must read.

Beatrice lives in a society that is divided in to 5 factions that are based on a particular virtue - Candor (the honest), Abnegation (the selfless), Dauntless (the brave), Amity (the peaceful), and Erudite (the intelligent).

When children reach the age of 16 they take an apptitude test to decide which faction to join and dedicate the rest of their lives to. Beatrice has grown up Abnegation, but she is very conflicted when forced to chose her faction; does she choose her family or who she is inside? Of course Beatrice doesn't fit into one faction and she learns this is because she is Divergent - something she must never tell anyone.

I was fascinated by this idea of dividing people based on these traits, and how each of the factions behaved. The internal struggle Beatrice has between holding back her instincts and acting according to her faction was very believable. It was interesting all the ways her Abnegation upbringing affected her daily activities in her new faction. She was so innocent and oblivious in her feelings for Four. I really loved reading as their relationship developed.

Roth is amazing with her details. I can really picture the Dauntless Headquarters, and I am excited to see how it looks on the big screen. I could not put the book down and I finished it in 2 days.

I am currently #4 on the list for Insurgent, but I doubt I can wait that long to read it! I'm sure I will be 'one-clicking' any minute now. The 3rd book in the series, Allegiant, is due out October 22, 2013.

I can't wait to see the Divergent movie in March 2014! I think Shailene will make a great Tris! If you need more convincing check out the trailer -


Rating: 5 out of 5 Stars. If you loved Hunger Games, you will enjoy Divergent. Even if you think you don't like "Sci-Fi" (which I thought I hated until I realized that both HG and Divergent are Sci-Fi) you will enjoy this book. It has action, romance, drama - it's a story so many of us can relate to - coming in to adulthood and finding where you belong.

Monday, September 9, 2013

Under Cabinet Magnetic Spice Rack

We have been looking for a spice rack solution for our kitchen. Our spices are in a cabinet on the opposite side of the kitchen as our stove, and it's above the sink - Not Convenient at all! We looked at different magnetic racks, but none had the quality we were looking for, nor did we have any wall space. I decided to make my own magnetic jars and we decided to have them magnetize to the under side of our top cabinets!

First, we used some left over sheet metal to create a surface for the magnets to stick to. We used construction adhesive to glue the metal to the under side of the cabinets. We used clamps to hold it in place while it dried.


Another option for a magnetic surface is using an old cookie sheet or painting the surface with magnetic paint.

I found some small canning jars at Hobby Lobby to store the spices in. We glued a super strong magnet to the lid of each jar. I found the super strong magnets at Home Depot.


I purchased some vinyl chalkboard labels so we could write what spices were in each jar, that way we could reuse the labels if we changed the spices.


Once all the jars are assembled and filled with spices all we had to do was stick the jars up!


I love how the spices look! They are super convenient and take up no counter top space! We can easily fit more jars so we will be adding some as soon as Hobby Lobby gets more in! 


Thursday, September 5, 2013

The Spectacular Now: The Movie

Over Labor Day weekend I was able to see The Spectacular Now movie. This movie is based on the book by Tim Tharp, which I really enjoyed, and it stars Miles Teller and Shailene Woodley.

Miles and Shailene were amazing! I thought Aimee was a weak, sad girl in the novel, but Shailene portrayed her as a strong female who grew up and became even stronger. On the contrary, I believed Sutter's confidence throughout the novel, but maybe that was because it was told from his point of view. In the movie I could see through his act, which I think went well with the movie's ending. I see Shailene becoming the new Hollywood It Girl, especially with her upcoming movies (Divergent, The Fault on Our Stars).

The movie was very fast paced and if you haven't read the book I don't know if you would fully understand the characters. The movie left out just how troubled Sutter was, it was more implied based on other's reactions.

I was very pleased with the movie's ending. While it wasn't a 180 from the book ending, it showed that maybe Sutter can change, and maybe there is hope for he and Aimee in the future.

Overall, I loved The Spectacular Now movie and book! I would recommend reading the book before seeing the movie, and I think you will enjoy both stories for very different reasons.

The next book-soon-to-be-a-movie combination I'm reading is The Wolf of Wall Street, the movie stars Leonardo DiCaprio and comes out in November.

Monday, August 19, 2013

Planning a Disney Vacation

We took a family vacation (6 adults, no children) to Disney World back in December 2012. I know it's been a few months, but I thought sharing my experience might help others plan a great trip!


My number one planning tip is to use a Disney Vacation Specialist. They are FREE and made our planning much less stressful. I highly recommend - Rochelle @ https://www.facebook.com/RochelleMickeyVacations.

A vacation specialist will get you a vacation quote, book your vacation, make your dining reservations, add any discounts that may become available, offer advice on anything Disney (restaurants etc) and can make changes easily to any of these things!

When to Go

The biggest decision to make is what time of year to visit Disney. Obviously you want a time that's not crowded, and not HOT. There are many websites that offer Crowd Levels per park by day. Undercover Tourist has a great online calendar. It also includes park hours and special events.


The next thing I considered is when is Free Dining offered. Each year (usually for less crowded days) Disney will offer their Dining plans for FREE. This is a great time to go! All you need to do is research what were the days that Free Dining was offered in the previous years and use that as a basis for your trip. Now the days might not be exactly the same when free dining is announced, but if you needed to tweak your check-in day in order to be within the Free Dining window, your Disney Vacation Specialist can easily do that for you. (A good site for Free Dining news is Chip & Co. He has great tips as well. )

Where to Stay

We stayed at the Pop Century Resort. This is a value priced resort. We didn't plan on spending much time in the rooms nor would we use the pools since it was December. These rooms have 2 double beds and plenty of space for 4 adults. I had talked with friends who had stayed here in the past and they recommended Pop over the other value resorts because it had it own bus, rather than sharing a bus like the All Star Resorts do.

When free dining is offered, value resorts only get the Quick Service Dining Plan for free. You can easily upgrade to the Standard Dining Plan for just a little extra a day. (Right now it's $18 per night per person.)

Disney Dining Plan

The standard dining plan includes One Snack, One Counter Service Meal and One Table Service Meal per night of your stay. You also receive a refillable mug that you can use at your resort's food court.

We are foodies, so we definitively found the Dining plan worth our money. We knew we wanted to eat at nice sit-down restaurants and enjoy ourselves. So at only $12 (the price has since increased to $18) a day we knew we would eat our monies worth. The only thing extra you will have to pay with the Dining Plan is gratuity for the table service meals.

You must make Advanced Dining Reservations (ADRs) for all your table service meals. These can be made 6 months in advance of your check-in date. I had our Disney Vacation Planner book all these for us.

How I Plan

I started planning our vacation about 7 months in advance. My family does well when everything is scheduled for a vacation. So I made a spread sheet of what parks we would be visiting on which day (based on crowd levels and extra magic hours) and then I based our ADRs on this. I knew I didn't want to waste too much time "hopping" around for our meals, so I tried to keep our ADR for the park we spent the majority of the day in, or at a resort that was close to the park we would be in. (Example: We ate dinner at Ohana (at the Polynesian Resort) the day we spent in the Magic Kingdom because it is just a boat or Monorail ride away.)

Here is my actual Disney Spreadsheet. 


Planning out each day this way can help you decide if you need Park Hopping passes. It is possible to do one park per day, but we didn't want to be too rushed so we opted for 6 days with Park Hopping. This way we could always go back if we missed a parade or something that we really wanted to see.

It is also important to see what times the parades and firework shows are since these are not offered everyday. You definitively don't want to miss the Main Street Electrical Parade and Wishes Fireworks show.


I plan on blogging more about our Disney World vacation and sharing more tips and reviews to help others with their planning!

Wednesday, August 14, 2013

The Spectacular Now

The Spectacular Now by Tim Tharp

I decided to read this book after learning the movie version was coming out this summer and one of my favorite actresses was starring - Shailene Woodley. I have enjoyed her on Secret Life of the American Teenager (which sadly has ended), and I am so excited she has a few movies coming out soon.
Life is spectacular. Forget the dark things. Take a drink and let time wash them away to where ever time washes away to.
Sutter Keely. He's the life of the party. He always has his 7-Up and booze in hand. His life is just cruising along, until he meets Aimee.
Aimee's not popular. She's smart. She has dreams. But she doesn't have fun. Sutter decides he can change her and show her how to have a good time.

Of course she falls in love with him. And even though he keeps denying it, he loves her too.
She's drenched and bedraggled, but I've never loved anyone as much as I love her right now. That's how I know I'll have to give her up.
Tharp puts you in the mind of Sutter. He is a complicated character and a charming narrator. He just draws you in.

I read this book a few weeks ago and I still don't know what I thought of the ending. I guess I'm a sucker for a happy ending. I've come to expect it. So when this book didn't give Sutter and Aimee the 'happily ever after' I wanted, initially I was upset. But let's face it. The ending was real. People don't change. We don't always get a happy ending. Maybe that's the point of the book. A healthy dose of reality.

Rating: 4 out of 5 Stars. Read this book, it will definitively make you think.

I'm excited to see the movie and see if they change anything (especially the ending.) Looks like I will have to wait til it comes out on DVD in Oct/Nov since no movie theaters near by are showing it.

Buy Spectacular Now on Amazon

Monday, August 12, 2013

Picture Frame Shelves

I've been wanting to change my living room wall art for a while. I finally decided to make a picture frame shelf wall.

Ikea makes great, affordable picture ledge shelves that are perfect for this. Sadly, they don't ship and we don't have an Ikea nearby. So we made our own! We used cedar and stained it to match my living room furniture.

Each self is only 3 pieces of wood. The bottom which is 3 1/2 inches x the length you want your shelf (mine are about 4 feet and about 2 feet.)

The back piece (which is where you screw the shelves to the wall) is about 2 inches, and the front picture ledge is about 1 inch. You just glue all the pieces together and voila - a picture ledge shelf.


All you need to hang the shelves are screws and possibly anchors if you aren't hanging on studs. We used 3 screws/anchors for the large shelf, and 2 for the smaller ones.


Then I added framed pictures and some nic-nacs. I loved how it turned out!

I also added a collage frame in my living room. This is my All About Lola collage! 


Friday, August 2, 2013

Let There Be Light

After 3 years my master bedroom is getting closer to what I envisioned! We finally moved the bed to it's proper place and we were ready to install some wall lamps on both sides of the bed.

I ended up ordering wall lamps from Home Depot because I could not find any that I liked in stores. I decided on this Oil Rubbed Bronze Swing Arm Lamp (Wow the price has gone up $12 since I ordered it.) It is a simple, traditional looking wall lamp which is just want I wanted.

The first thing to do when installing anything electrical is to hire an electrician (or get a family member who is an electrician to help :)) You must make sure there is power that you can run to where you want your wall lamps.

Always turn the electricity off (at the breaker) when dealing with wires etc.

Once the wires have been run, then you can decide on the placement of the lamps. I did some research online and most bedside wall lamps are centered with the top of your decorative pillows. Then the next measurement would be distance from your headboard (which we don't have yet) so I used my window as a guide and placed the lamps about 8 inches away from the curtains.


So we traced the blue electrical work box and then cut a hole for both lamps. Then we pulled the wires through and screwed the work box in place. 


These lamps come with a plug-in option as well. Since we had wires run, we needed to remove the cord and expose the wires. 


Then we needed to attach the back plate to the wall and use wire nuts to connect the wires. Next we fed the wires through the hole in the back plate into the work box so we could attach the lamp to the plate.


The lamp attached to the plate with 3 decorative screws.  


Then we turned the power back on and the lamps worked!


I love how it turned out. It only took us a few hours to install these lamps. Now each side of the bed has a lamp, perfect for late night reading! I also love that there is more room on the night stands since we no longer need table lamps. 

Wednesday, July 31, 2013

Cookie Butter

Last week I stumbled up a recipe that used Trader Joe's (apparently FAMOUS) Cookie Butter. But sadly, I don't have a Trader Joe's nearby. So I decided to find a recipe and make some cookie butter to see what all the fuss was about.

I found Averie Cooks recipe for Cookie Butter Peanut Butter. It's simple, with only 5 ingredients I was excited to see how it turned out.

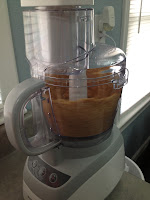
I started with my Honey Roasted Peanuts in my food processor.


As I watched them whirl round and round, I thought 'This is never going to get smooth.' But I waited, like the recipe said, and watched the transformation before my eyes.


I was so impressed! Creamy, delicious peanut butter in 5 minutes! I think I will be making my own peanut butter in the future.

Then I added 12 cookies. I added a few more later because it was still thin, so in total I probably added 16-18 cookies.


Then I added the vanilla and the tablespoon of cinnamon. I think this is too much cinnamon. The cookies have a cinnamon flavor so I would reduce this to a teaspoon of cinnamon.

Next I poured in the white chocolate chips. I ended up adding another handful because the butter wasn't sweet enough for me.


After blending all the ingredients together, the mixture was very loose. I was hoping this was due to the heat of the food processor so I decided to chill the butter over night. This picture is before it was chilled.


The next day it had firmed up so I went right in with a spoon. And to be honest, I was disappointed. The cookie butter tasted good but it wasn't anything I could go crazy with and eat in one sitting. I ended up dipping the leftover cookies in the butter and liked that better.


I have a few recipes I want to try with the cookie butter, maybe I will like those better than just the butter by itself. Maybe the homemade version isn't a good substitution for the Trader Joe's Cookie Butter. As soon as our Trader Joe's opens this fall I will buy some cookie butter and see for myself. 

Monday, July 29, 2013

Kitchen Update

Ever since we finished the kitchen renovations, I wasn't happy with the curtains. They were heavy and too dark for the kitchen.

So I have been keeping an eye out for the right window treatments and I finally found some at K-mart! They were super affordable and are the perfect curtains that really brighten up the kitchen.

Here was the kitchen curtains before: long, grey, almost too formal curtains.


And here are the new ones: light, white, airy curtains.
Kate Tier Panels and Valance in Blue.


I am so happy with how they look! They diffuse enough light to block out the evening sun, but they also brighten up my kitchen.